
Introduction
Have you ever felt like your mouse cursor moves too fast or too slow? How to Test Mouse DPI in 2026: Check Your Mouse DPI Accurately Maybe you play games and want better aim. Or perhaps you just bought a new mouse and want to know its settings.
The answer lies in something called DPI.
DPI stands for Dots Per Inch. It tells you how sensitive your mouse is. A higher DPI means the cursor moves farther when you move the mouse a little. A lower DPI means you need to move the mouse more to get the cursor across the screen.
But here’s the problem: Windows does not show you your mouse DPI. The slider in your settings is not your DPI. It’s just a software speed control.
So how do you find your real DPI?
In this guide, you will learn how to test mouse DPI in 2026 using three simple methods. By the end, you will know exactly what your mouse is doing and how to adjust it for better control.
Table of Contents
What Is Mouse DPI?
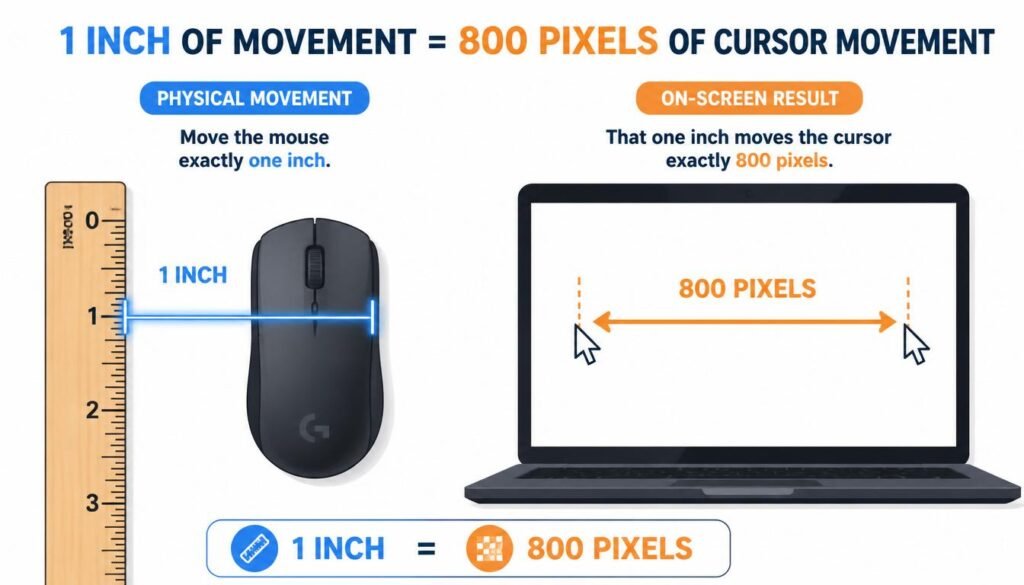
DPI stands for Dots Per Inch. In simple terms, it measures how many pixels your cursor moves when you move your mouse one inch across your desk.
For example:
- If your mouse is set to 800 DPI, moving it one inch moves the cursor 800 pixels on your screen.
- If your mouse is set to 1600 DPI, moving it one inch moves the cursor 1600 pixels.
Higher DPI = faster cursor. Lower DPI = slower cursor.
Some people call it CPI (Counts Per Inch). It means the same thing.
Important: DPI is a hardware setting inside your mouse. It is not the same as the pointer speed slider in Windows.
Why Does Mouse DPI Matter?
Knowing your mouse DPI helps you in many ways:
- Better gaming aim — Many pro gamers use specific DPI settings for better accuracy.
- Consistent feel — If you switch between computers, knowing your DPI helps you set the same feel everywhere.
- Work efficiency — The right DPI makes clicking small buttons and editing images much easier.
- Troubleshooting — If your cursor feels off, knowing your DPI helps you fix it faster.
Here are common DPI ranges and who uses them:
| DPI Range | Best For |
|---|---|
| 400–800 | Competitive FPS gaming |
| 800–1600 | Everyday work and casual gaming |
| 1600–2400 | 4K monitors and large screens |
| 2400+ | Very fast navigation (rarely needed) |
What You Need Before Testing
Before you test your mouse DPI, take these steps. They will make your results much more accurate.
Turn Off Mouse Acceleration
Mouse acceleration changes how far the cursor moves based on how fast you move the mouse. This will ruin your DPI test.
On Windows:
- Open Settings.
- Go to Bluetooth & devices → Mouse.
- Click Additional mouse settings.
- Go to the Pointer Options tab.
- Uncheck “Enhance pointer precision”.
On Mac:
- Open System Preferences.
- Go to Mouse.
- Turn off Natural scrolling and adjust tracking speed to the middle.
Set Your Screen to 100% Scaling
If your display scaling is above 100%, your DPI test will be wrong. Set it to 100% for accurate results.
Clean Your Mouse Sensor
Dust or dirt on the sensor can affect movement. Wipe it gently with a soft cloth.
Use a Consistent Surface
Test on your regular mouse pad or desk. Different surfaces can change how the sensor reads movement.
Method 1: Use Manufacturer Software (Most Accurate)
The best way to test your mouse DPI is through the software made by your mouse brand. This software talks directly to your mouse and shows the exact DPI.
Logitech Mice
- Download Logitech G HUB or Logi Options+.
- Open the software and select your mouse.
- Look for DPI or Sensitivity settings.
- The current DPI will be shown clearly.
Razer Mice
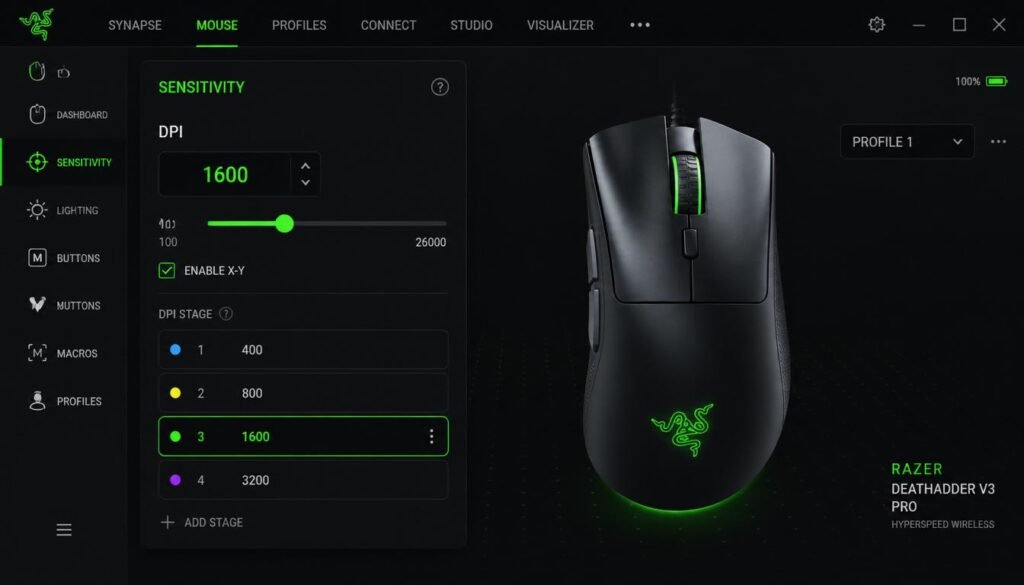
- Download Razer Synapse.
- Open the software and select your mouse.
- Go to the Performance tab.
- Your current DPI will be displayed.
Corsair Mice
- Download Corsair iCUE.
- Open the software and select your mouse.
- Look for DPI settings in the dashboard.
Other Brands
Most gaming mice have companion software. Check the manufacturer’s website for:
- SteelSeries GG
- HyperX NGENUITY
- ASUS Armoury Crate
- Glorious Core
Pros: Very accurate, shows exact DPI, lets you change settings.
Cons: Requires downloading software, only works for supported mice.
Method 2: Use a Free Online DPI Analyzer (Easiest)
If you don’t want to install software, online DPI analyzers are a great choice. They work in your browser and are completely free.
How to Use an Online DPI Analyzer
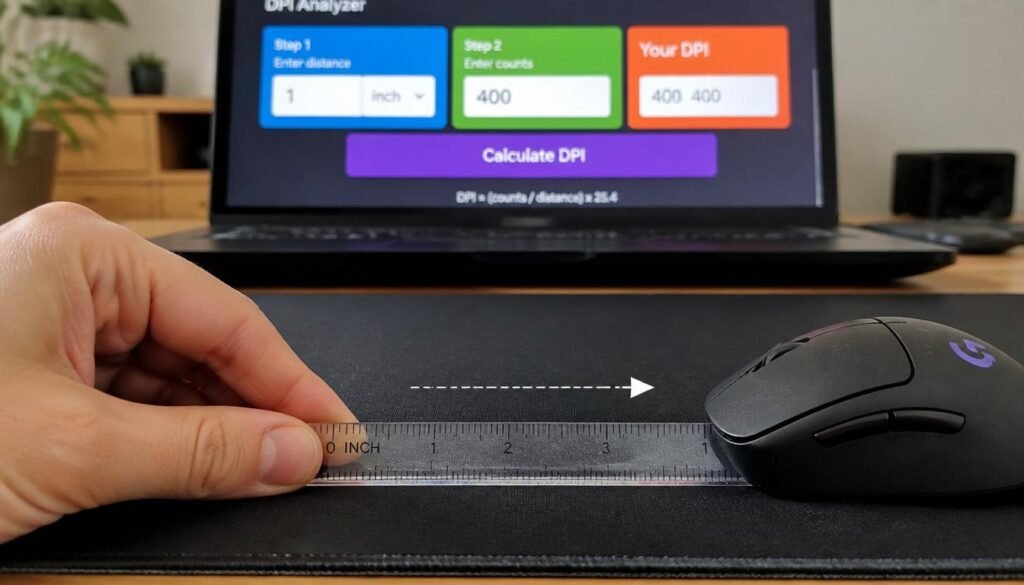
Here is a simple step-by-step guide to test your mouse DPI online:
Step 1: Go to a DPI testing website. Good options include:
Step 2: Place a ruler on your desk.
Step 3: Enter the distance you will move your mouse (for example, 1 inch or 2 inches).
Step 4: Click and hold the button on the tool.
Step 5: Move your mouse the exact distance you measured with the ruler.
Step 6: Release the button. The tool will show your estimated DPI.
Step 7: Repeat 3–5 times and take the average.
What the Results Mean
The online tool calculates your DPI by measuring how many pixels your cursor moved compared to how far you moved your mouse.
If the number matches what you expected (like 800 or 1600), your mouse is working correctly. If it’s very different, check if you turned off mouse acceleration.
Pros: No installation, works on any computer, completely free.
Cons: Less accurate than manufacturer software, requires careful measurement.
Method 3: Manual Measurement with a Ruler (No Software Needed)
If you want to test your mouse DPI without any software at all, you can do it manually. This method takes a little more work, but it works for any mouse.
What You Need
- A ruler or measuring tape
- A piece of paper and a pen
- A way to see your cursor position (the Windows “Magnifier” tool works well)
Step-by-Step Instructions
Step 1: Turn off mouse acceleration as described above.
Step 2: Open the Windows Magnifier tool or use a pixel coordinate display tool. You need to see the exact X and Y position of your cursor.
Step 3: Place your mouse at the left edge of your mouse pad. Mark the starting position.
Step 4: Note down the current cursor position (X and Y coordinates).
Step 5: Using your ruler, move your mouse exactly 1 inch (2.54 cm) to the right.
Step 6: Note down the new cursor position.
Step 7: Calculate the difference in pixels. For example, if your cursor moved from X=100 to X=1700, the difference is 1600 pixels.
Step 8: Your DPI equals the pixel difference divided by the inches moved. In this case, 1600 pixels ÷ 1 inch = 1600 DPI.
Step 9: Repeat 3 times and average the results.
Example Calculation
| Trial | Pixels Moved | Inches Moved | DPI |
|---|---|---|---|
| 1 | 1590 | 1 | 1590 |
| 2 | 1605 | 1 | 1605 |
| 3 | 1598 | 1 | 1598 |
| Average | 1598 | 1 | 1598 DPI |
Pros: Works for any mouse, no software needed.
Cons: Requires careful measurement, easier to make mistakes.
Common Mistakes When Testing Mouse DPI
Avoid these errors to get accurate results.
❌ Leaving Mouse Acceleration On
This is the most common mistake. With acceleration on, moving the mouse slowly gives a different result than moving it fast. Always turn it off first.
❌ Using the Wrong Screen Scaling
If your display is set to 125% or 150%, the pixel counts will be wrong. Set scaling to 100% before testing.
❌ Moving the Mouse at an Angle
Move the mouse in a straight line. Any angle will throw off the measurement.
❌ Lifting the Mouse
Keep the mouse flat on the surface. Lifting it changes the sensor reading.
❌ Only Testing Once
Do at least three tests and take the average. One test can be off due to small errors.
❌ Confusing DPI with Pointer Speed
Remember: DPI is a hardware setting. The Windows pointer speed slider is a software multiplier. They are not the same thing.

Frequently Asked Questions
How do I check my mouse DPI in Windows 10 or 11?
You cannot check DPI directly in Windows settings. Windows shows pointer speed, not DPI. You need to use manufacturer software, an online tool, or the manual method described above.
What DPI should I use for gaming?
Most competitive FPS players use 400–800 DPI. MOBA and RTS players often prefer 800–1600 DPI. The best DPI depends on your personal preference and play style.
What DPI should I use for everyday work?
For regular office work, web browsing, and general use, 800–1600 DPI works well for most people. If you have a 4K monitor, you may prefer 1600–2400 DPI.
Why does my tested DPI not match the box?
The DPI on the box is usually the maximum the sensor supports. Your mouse may be set to a lower DPI stage. Also, different surfaces and settings can cause small differences.
Is higher DPI always better?
No. Very high DPI can make the cursor jumpy and hard to control. A stable, consistent DPI is more important than a high number.
What is the difference between DPI and eDPI?
DPI is your mouse’s hardware sensitivity. eDPI (effective DPI) is DPI multiplied by your in-game sensitivity. It gives you a single number that represents your total sensitivity.
Can I test mouse DPI on a Mac?
Yes. Mac does not show DPI directly either. Use an online DPI analyzer or the manual ruler method.
How often should I test my mouse DPI?
You only need to test when:
- You get a new mouse
- You change your DPI settings
- Your cursor feels different than before
- You switch to a different computer
Conclusion
Testing your mouse DPI is easier than you think. In 2026, you have several great options to check your mouse DPI accurately.
To recap the three methods:
- Manufacturer software — Most accurate. Use Logitech G HUB, Razer Synapse, or your brand’s app.
- Online DPI analyzer — Easiest. No installation needed. Just use a ruler and your browser.
- Manual measurement — Works for any mouse. Takes a little more effort but gets the job done.
Remember to turn off mouse acceleration first. Test multiple times and average your results. And don’t worry if your DPI doesn’t match what’s on the box — that’s completely normal.
Now you know exactly how to test mouse DPI in 2026. Go ahead and check your mouse. You might be surprised by what you find!
Once you know your DPI, you can adjust it to feel just right. Whether you’re gaming, working, or just browsing, the right DPI makes everything better.