
Introduction
Do you feel like your mouse moves too fast or too slow? Maybe the cursor zips across the screen when you barely touch the mouse. Or maybe you have to drag your mouse across your desk just to move the cursor an inch.
This happens because of your mouse DPI setting. DPI stands for Dots Per Inch. It controls how sensitive your mouse is.
Learning how to change mouse DPI can make your computer much easier to use. Whether you play games, edit photos, or just browse the web, the right DPI setting helps you work faster and more comfortably.
In this guide, you will learn exactly how to change mouse DPI on any device. We will cover Windows, Mac, gaming mice, and more. Let’s get started!
Table of Contents
What Is Mouse DPI?
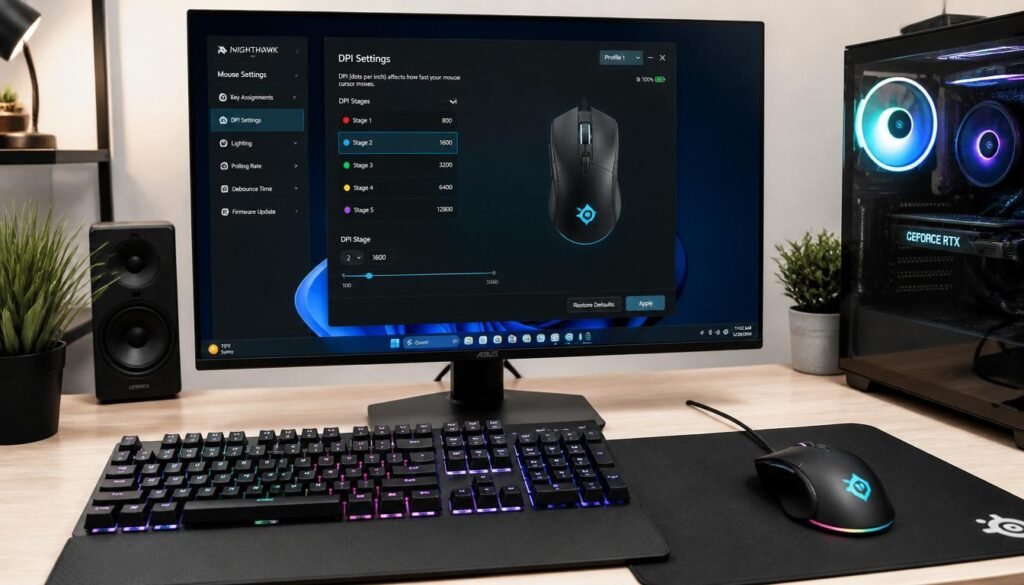
DPI stands for Dots Per Inch. It measures how far your cursor moves when you move your mouse one inch.
Think of it like this:
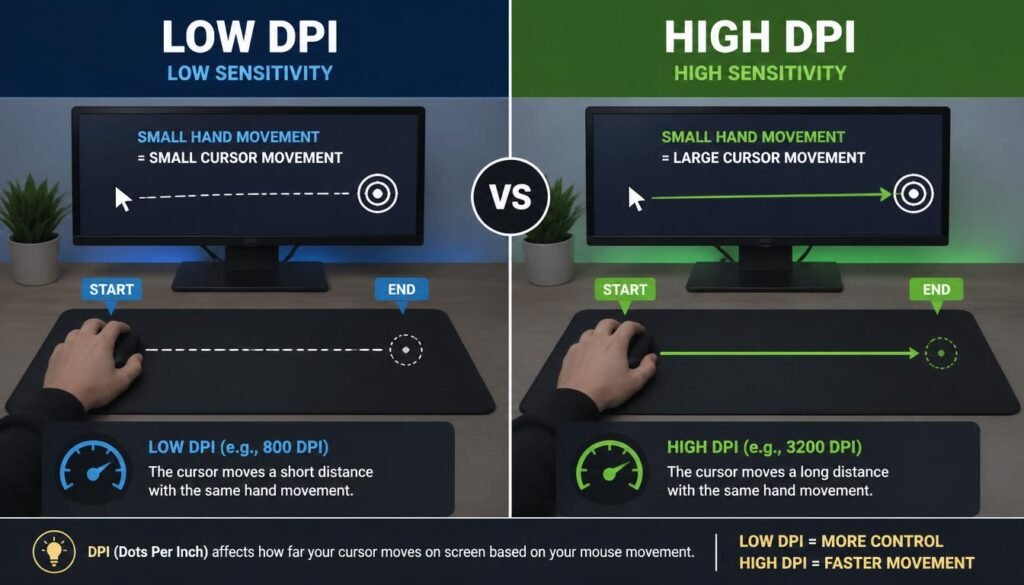
- High DPI = cursor moves far with small hand movements
- Low DPI = cursor moves short distance with the same hand movement
Some brands use the term CPI (Counts Per Inch). It means the same thing.
Here is a simple example:
- If your mouse is set to 800 DPI, moving it one inch moves the cursor 800 pixels on your screen.
- If your mouse is set to 1600 DPI, moving it one inch moves the cursor 1600 pixels.
How Does Mouse DPI Work?
Your mouse has a small camera inside. It takes hundreds of pictures every second as you move it. The mouse compares these pictures to figure out how far and in what direction you moved.
The DPI setting tells the mouse how many “dots” or pixels to move for each inch of physical movement.
Important: DPI is different from mouse sensitivity.
When you change DPI, you change how your mouse reads your physical movements. When you change sensitivity, you change how your computer reacts to those movements.
Benefits of Changing Your Mouse DPI
Changing your mouse DPI can improve your computer experience in many ways:
1. Better gaming performance
- Lower DPI (400–800) gives you more precision for aiming in shooters
- Higher DPI helps you turn quickly in fast-paced games
2. More comfortable everyday use
- Adjust DPI to match your natural hand movements
- Reduce wrist strain from moving the mouse too much
3. Better for high-resolution monitors
4. More precise work
- Lower DPI helps with photo editing, graphic design, and video editing
Method 1: How to Change Mouse DPI Using Dedicated Buttons
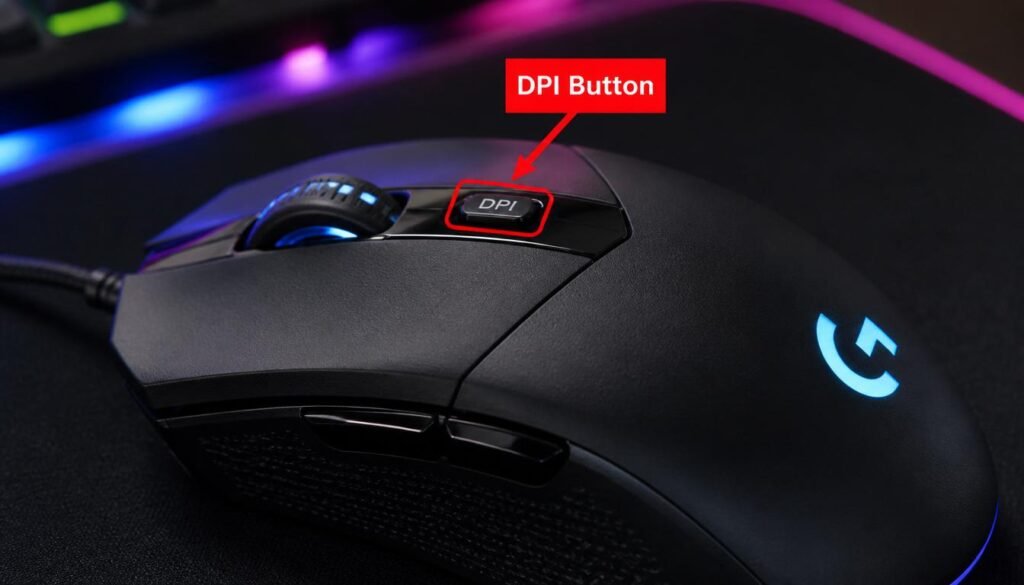
Many mice, especially gaming mice, have DPI buttons right on the device.
Step-by-Step Instructions:
Step 1: Look for buttons near the scroll wheel. They might have a DPI label or symbol.
Step 2: Press the DPI button to cycle through preset DPI levels.
Step 3: Watch your cursor speed change as you press the button.
Step 4: Stop when you find a speed you like.
For Some ASUS ROG Mice:
- Find the DPI button on your mouse
- Press and hold the DPI button for 3 seconds until the LED light turns on
- Roll the scroll wheel forward or backward to adjust DPI
- Press the DPI button again to save your setting
For Some Razer Mice:
- Press the DPI stage up button to increase sensitivity
- Press the DPI stage down button to decrease sensitivity
Method 2: How to Change Mouse DPI on Windows
If your mouse does not have DPI buttons, you can change the pointer speed in Windows settings.
Note: This changes sensitivity, not true DPI. But it gives you the same effect.
Step-by-Step Instructions:
Step 1: Press the Windows + I keys to open Settings.
Step 2: Click on Bluetooth & devices (or Devices on older Windows).
Step 3: Click Mouse in the left menu.
Step 4: Click Additional mouse options (or Other mouse options).
Step 5: Go to the Pointer Options tab.
Step 6: Find the Select a pointer speed slider.
Step 7: Drag the slider:
- Move right = cursor moves faster
- Move left = cursor moves slower
Step 8: (Optional) Uncheck Enhance pointer precision. This turns off mouse acceleration, giving you more consistent movement.
Step 9: Click Apply and OK.
Pro tip: Start with the slider at the 6th notch (middle-right). This feels like about 1200 DPI on a 1080p screen.

Method 3: How to Change Mouse DPI on Mac
On a Mac, you adjust the tracking speed. This works like DPI sensitivity.
Step-by-Step Instructions:
Step 1: Click the Apple menu in the top-left corner.
Step 2: Select System Settings (or System Preferences on older Macs).
Step 3: Click Mouse in the left sidebar.
Step 4: Find the Tracking speed slider.
Step 5: Drag the slider:
- Move right = cursor moves faster
- Move left = cursor moves slower
Step 6: Close the window. Your changes save automatically.
Alternative path for accessibility:
- Go to System Settings > Accessibility > Pointer Control
- Find Mouse & Trackpad settings
- Adjust the Pointer speed slider
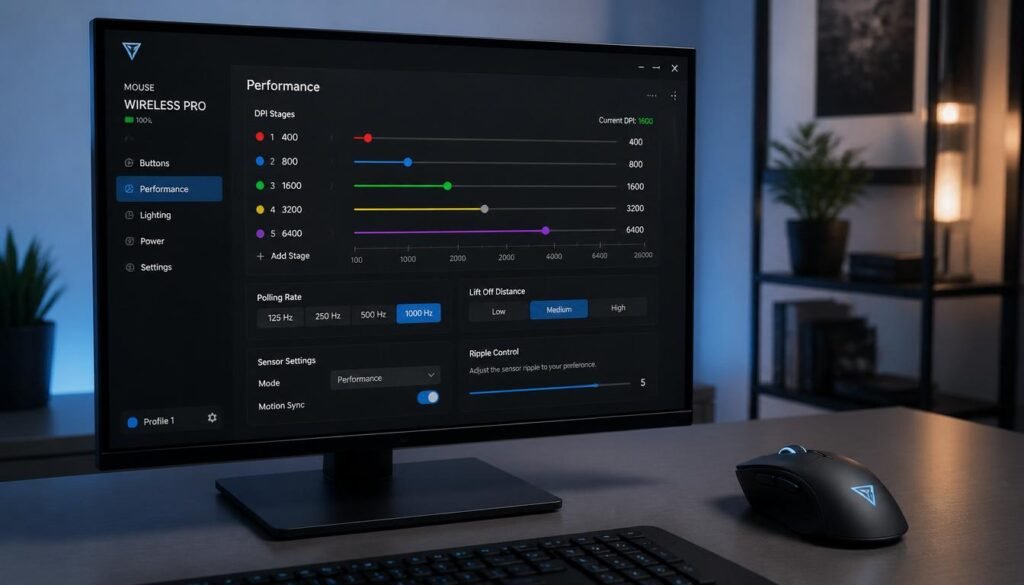
Method 4: How to Change Mouse DPI Using Gaming Software
Gaming mouse brands offer special software to change DPI exactly. Here are the most popular ones:
Logitech (G Hub)
- Download and install Logitech G Hub
- Open the software and select your mouse
- Click Sensitivity (DPI) settings
- Drag the sliders to set custom DPI values
- Save your settings
Razer (Synapse)
- Open Razer Synapse
- Select your mouse from the device list
- Go to the PERFORMANCE tab
- Adjust DPI using the stage options or slider
Corsair (iCUE)
- Open iCUE and select your mouse
- Click DPI
- Click the + button to add a new DPI preset
- Adjust the DPI in the DPI Stages window
- Click Set as Default to save
ASUS (Armoury Crate)
- Open Armoury Crate
- Click Device and select your mouse
- Go to the Performance tab
- Select a DPI preset and drag the slider
- Or type a number directly into the box
How to Choose the Right DPI Setting
There is no perfect DPI for everyone. It depends on what you do and what feels comfortable.
Recommended DPI Settings by Activity:
| Activity | Recommended DPI |
|---|---|
| Office work, browsing | 800 – 1600 |
| Photo editing, design | 400 – 800 |
| FPS gaming (shooters) | 400 – 800 |
| MOBA gaming (League of Legends) | 800 – 2400 |
| Large 4K monitors | 1600 – 3200 |
Most people find a good balance between 400 and 3600 DPI.
How to Find Your Sweet Spot:
Step 1: Start at 800 DPI.
Step 2: Use your computer normally for a few minutes.
Step 3: If the cursor feels too slow, increase DPI by 200.
Step 4: If the cursor feels too fast, decrease DPI by 200.
Step 5: Repeat until it feels natural.
The rule of thumb: Your cursor should move from one side of the screen to the other with about 1–2 inches of mouse movement.
Common Mistakes When Changing Mouse DPI
Avoid these errors when adjusting your mouse DPI:
Mistake 1: Setting DPI too high
- Very high DPI (over 5000) makes your cursor jumpy and hard to control
- Most people never need more than 3200 DPI
Mistake 2: Changing both DPI and sensitivity at once
- Pick one method and stick with it
- Changing both can confuse you
Mistake 3: Forgetting about mouse acceleration
- “Enhance pointer precision” on Windows adds acceleration
- This makes your cursor move differently based on speed
- Turn it off for more consistent control
Mistake 4: Not testing your new setting
- Always try your new DPI in real tasks
- Play a game, edit a document, browse the web
- Adjust again if needed
Mistake 5: Using the same DPI for everything
- Many gaming mice let you save multiple DPI presets
- Use low DPI for aiming and high DPI for quick turns
- Switch between them with the DPI button
Frequently Asked Questions
What does DPI stand for?
DPI stands for Dots Per Inch. It measures how sensitive your mouse is.
How do I check my current DPI?
- If you have gaming software (like G Hub or Synapse), open it and check the settings
- Some mice show DPI with LED color changes
- If you don’t have software, you can’t check the exact number. Just adjust until it feels right.
How to change mouse DPI without software?
Use the DPI buttons on your mouse. Most gaming mice have them near the scroll wheel.
How to change mouse DPI in Windows 10?
Go to Settings > Devices > Mouse > Additional mouse options > Pointer Options. Adjust the slider.
How to change mouse DPI in Windows 11?
Go to Settings > Bluetooth & devices > Mouse > Additional mouse settings > Pointer Options. Adjust the slider.
How to change mouse DPI on a Mac?
Go to System Settings > Mouse and adjust the Tracking speed slider.
What DPI is best for gaming?
Most pro gamers use 400 or 800 DPI for shooters. For other games, 800–2400 DPI works well.
What DPI is best for office work?
800–1600 DPI is comfortable for most office tasks and web browsing.
Does higher DPI mean better?
Not always. Higher DPI makes your cursor faster, but it can also make it harder to control. Choose what feels comfortable for you.
Can I change DPI on any mouse?
Most modern mice let you change DPI. Gaming mice have dedicated buttons. Basic mice may only let you change sensitivity in system settings.
Conclusion
Learning how to change mouse DPI is a simple skill that can make your computer much easier to use. Whether you want better aim in games, more comfort at work, or smoother browsing, the right DPI setting makes a big difference.
Here is a quick recap:
- DPI = Dots Per Inch. It controls mouse sensitivity.
- Use DPI buttons on gaming mice for quick changes
- Use Windows settings if your mouse has no buttons
- Use Mac settings to adjust tracking speed
- Use gaming software for exact control
- Start at 800 DPI and adjust until it feels right
Remember, there is no perfect DPI for everyone. The best setting is the one that feels most natural to you. Take a few minutes to experiment and find your sweet spot. Your wrist and your cursor will thank you!
Have questions about changing your mouse DPI? Drop a comment below!