
Does your mouse feel sluggish in the middle of a heated firefight? How to Change Mouse Polling Rate: The Complete Guide Are you experiencing unexpected stutter or frustrating FPS drops when you whip your cursor across the screen? The culprit might be your mouse polling rate.
Don’t worry—by the end of this complete guide, you’ll understand exactly what this setting does and how to change mouse polling rate on any brand. We’ll help you choose the right Hz, from 125Hz up to the blazing 8000Hz polling rate, to perfectly match your system. Whether you want to reduce input lag or simply find the best default polling rate for gaming, this mouse polling rate guide covers it all. Let’s fix your settings together.
Table of Contents
What Is Mouse Polling Rate? (The Fundamentals)
Simply put, your mouse polling rate is how often your mouse reports its position to your computer every second. It’s measured in polling rate Hz.
Think of it like a rapid-fire Q&A session. Your PC keeps asking, “Where are you?” and your mouse keeps answering. The faster it answers, the smoother your cursor moves.
Here’s what the numbers actually mean:
- 125Hz = reports every 8ms (standard office mice)
- 500Hz = reports every 2ms
- 1000Hz = reports every 1ms (the gaming sweet spot)
- 4000Hz = reports every 0.25ms
- 8000Hz = reports every 0.125ms (lightning-fast)
So when people ask “what does polling rate do on a mouse” —it basically controls how responsive your cursor feels during gameplay.

Polling Rate vs DPI: What’s the Difference?
This is where most gamers get confused. Let’s clear it up once and for all.
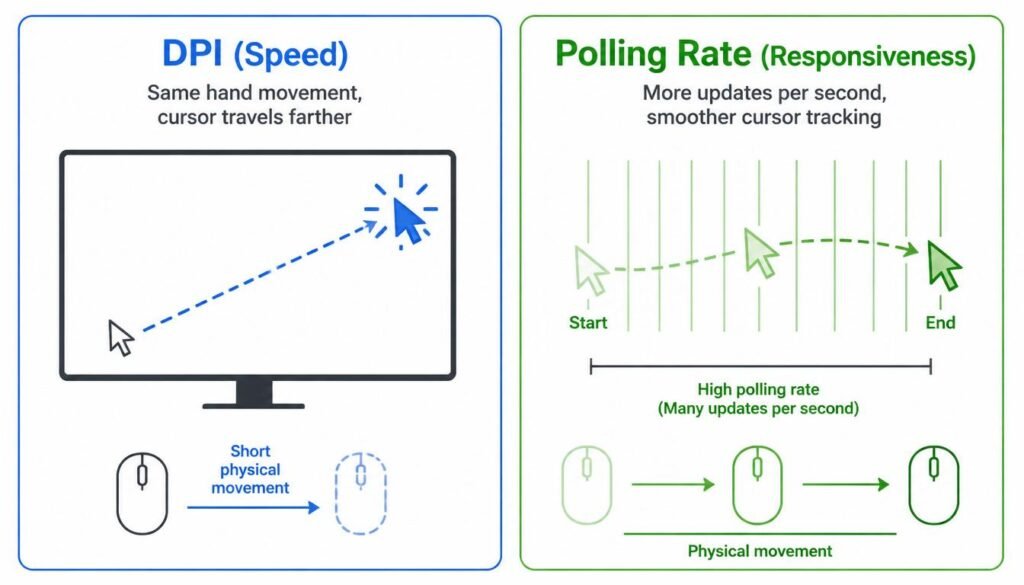
DPI (Dots Per Inch) controls how fast your cursor moves. Higher DPI means your cursor travels further with less physical movement. It’s about sensitivity and speed.
Polling rate controls how often your cursor position updates. It’s about responsiveness and smoothness.
Think of it this way: DPI is how far you jump; polling rate is how many times you jump per second.
They work together but are completely independent settings. You can have high DPI with low polling rate, or vice versa. Understanding the polling rate vs DPI difference is key to dialing in your perfect feel.
Why Change Your Polling Rate? (Pros & Cons)
Why would you even want to change your mouse polling rate? The main perk is lower latency. Bumping up to 1000Hz slashes input lag from 8ms down to just 1ms—massive for competitive shooters. Tracking feels smoother and more responsive.
But there’s a catch. Higher rates eat more CPU power and drain wireless batteries faster. In older games, a high setting can cause FPS drops or annoying stutter. Sometimes, you actually need to fix high polling rate FPS drop by lowering it.
So, always choose the right polling rate for your hardware. It’s all about finding that perfect balance between speed and system stability.
Hardware Requirements for High Polling Rates (4000Hz – 8000Hz)
Before you crank it to 8000Hz polling rate, let’s check your hardware. High polling rates demand serious PC muscle.
For 4000Hz and 8000Hz, you’ll need a powerful CPU. The recommended system for 8000Hz polling is at least an Intel i7 9th Gen or AMD Ryzen 7 2nd Gen. Older processors simply can’t keep up.
Your monitor matters too. Without a monitor capable of 240Hz+, you probably won’t notice the difference. Also, always plug directly into a motherboard USB port—hubs or docks introduce instability.
So yes, 8K feels amazing, but only if your rig can handle it!
How to Check Your Current Polling Rate (Before You Change It)
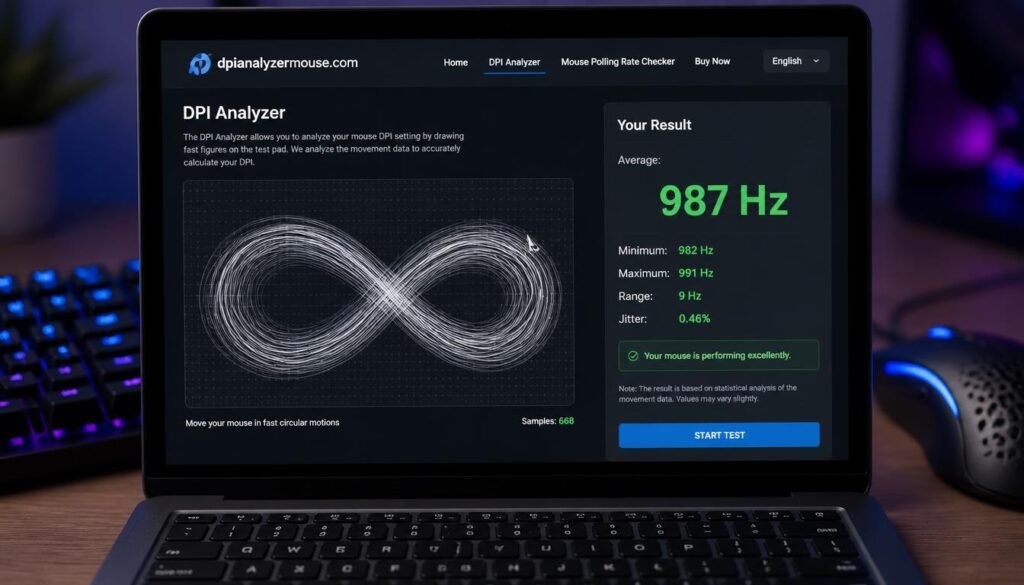
First, check your current setting. The easiest way is an online mouse polling rate test like dpianalyzermouse.com. Click “Start,” move your mouse in fast circles, and read your average Hz.
For deeper data, try MouseTester or Mouse Rate Checker for real-time stability.
Wondering how to check my current polling rate without software? Unfortunately, Windows has no built-in tool. So grab a free polling rate checker tool to establish a baseline. This lets you verify your change later and confirm your tweak actually worked!
How to Change Mouse Polling Rate (4 Methods)
Now for the main event—actually changing your mouse polling rate. We’ve got four ways to do it, so you’re covered no matter what mouse you own.
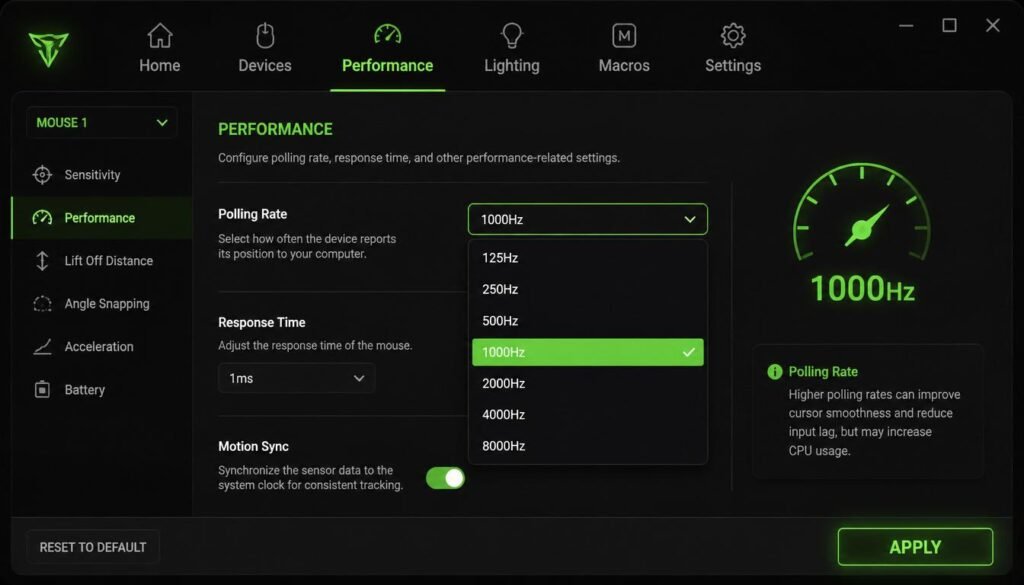
Method 1 uses official brand software like Razer Synapse 4, Logitech G HUB, Corsair iCUE, or Glorious CORE.
Method 2 uses a physical polling rate button on the mouse itself (common on ZOWIE models).
Method 3 uses keyboard shortcuts during plug-in.
Method 4 uses a USB polling rate tool like HIDUSBF for older or generic mice.
We’ll walk through each one step-by-step so you can easily change polling rate on any mouse.
Method 1: Official Brand Software (Most Common)
The easiest way to change polling rate Razer or any gaming mouse is through the official software. Every major brand offers a free app.
- Razer: Open Razer Synapse 4, select your mouse, click the mouse performance tab, and choose your preferred polling rate presets.
- Logitech: Launch Logitech G HUB, click your mouse, find polling rate under settings.
- Corsair: Navigate to Corsair iCUE, select your device, and adjust polling rate in performance settings.
- Glorious: Use Glorious CORE and pick your rate from the dropdown.
- SteelSeries: Open SteelSeries GG, go to Engine, and find polling rate in the performance tab.
Simply select your desired Hz, and you’re done!
Method 2: Physical Button on the Mouse
Some mice skip the software entirely. Brands like ZOWIE and Pulsar put a dedicated physical polling rate button right on the bottom of the mouse.
Simply press it repeatedly to cycle through available rates. A small LED indicator will flash or change color to show your current selection—green often means a high polling rate like 1000Hz, while red might indicate 125Hz.
It’s quick, requires no drivers, and works perfectly for tournament players who need to adjust polling rate on the fly without opening any apps. Just press and play!
Method 3: Keyboard Shortcut (Plug-in Method)
This trick works on select gaming mice without any software. It uses the side buttons (button 4 and 5) while plugging in the USB cable.
- 125Hz: Hold both side buttons (4 and 5) while plugging in.
- 500Hz: Press and hold button 5 while plugging in.
- 1000Hz: Press and hold button 4 while plugging in.
The mouse saves this as its default. To change polling rate again, simply unplug and repeat the process. It’s a handy plug-in method for quick adjustments when you’re away from your gaming rig!
Method 4: Third-Party Tools (For Mice Without Official Software)
Don’t have a gaming brand mouse? No problem. A USB polling rate tool like HIDUSBF can work wonders. It’s the most popular mouse polling rate software for generic mice on Windows.
Simply download it, run the installer, and select your desired Hz from the dropdown. It’s that easy!
For Linux users, usb_oc-dkms does the same job. Just follow a quick HIDUSBF tutorial online if you get stuck. This method lets you change polling rate Windows 11 or even older systems, giving basic mice a surprising performance boost!
How to Verify Your Polling Rate Change Was Successful
Don’t just assume it worked—confirm it! Open your online mouse polling rate test again or launch MouseTester. Click “Start” and move your mouse in fast, steady circles or figure‑eights.
Check the average and maximum readings. For 1000Hz, you should see 950–1000Hz. For 4000Hz, expect 3800–4000Hz. For 8000Hz, look for 7500–8000Hz.
If your numbers match your selected rate, congratulations—you’ve successfully verified your change. If not, double-check your settings and test again. This simple step ensures you’re actually getting the responsiveness you wanted!
Troubleshooting: Fix Stutter, Lag & FPS Drops
Still experiencing issues? Let’s troubleshoot.
If you’re seeing FPS drops or stutter when moving your mouse, your polling rate might be too high for your system. Try lowering it to 500Hz or even 125Hz.
For older games, drop to 125Hz—many classic engines simply can’t handle modern rates.
On Windows 11, ensure you have the latest updates installed. And if your 8K mouse only shows 1K, that’s normal out-of-the-box—just manually enable 8K in your software.
These quick fixes usually resolve mouse stutter and mouse polling rate causing stutter instantly!
Polling Rate and Battery Life (Wireless Mice)
If you’re using a wireless mouse, here’s something important to know—higher polling rates drain your battery significantly faster. That silky-smooth 1000Hz or blazing 4000Hz feels incredible, but it comes at a cost.
At 8000Hz wireless, you might find yourself reaching for the charging cable much more often. It’s a noticeable trade-off.
The smart move? Lower your polling rate to 125Hz or 250Hz during office work or casual browsing, then crank it back up for gaming sessions. This simple habit extends battery life without sacrificing performance when it truly counts!
Wired vs Wireless Polling Rate: Is There a Difference?
Great news—modern wireless technology has nearly closed the gap. Thanks to innovations like Logitech Lightspeed and Razer HyperSpeed, wired vs wireless polling rate is no longer a major concern.
Today’s 2.4GHz wireless delivers latency comparable to wired connections. Many premium mice even support 8000Hz polling rate wirelessly now.
So, what’s the catch? Wired offers absolute stability and zero battery worries. Wireless removes cable drag, giving you total freedom. Both handle gaming mouse polling rate equally well at 1000Hz.
Unless you’re a top-tier esports pro, you probably won’t notice the difference. Choose based on your preference for freedom or simplicity!
Polling Rate vs Monitor Refresh Rate: The Connection
Here’s something most gamers overlook—your polling rate vs monitor refresh rate matters more than you think.
If your mouse polling rate is 125Hz but your monitor runs at 240Hz, you’ve got a bottleneck. Your screen refreshes faster than your mouse can update. That means you’re not seeing the full smoothness your monitor offers.
For high polling rates like 4000Hz or 8000Hz, a monitor capable of 240Hz+ is highly recommended. Otherwise, you simply won’t perceive the benefit.
The golden rule? Match your polling rate to your refresh rate for the most responsive gaming experience possible!
Frequently Asked Questions (FAQ)
Does polling rate affect CPU usage?
Absolutely—especially at higher settings. At 125Hz or 500Hz, the impact is minimal. But when you jump to 4000Hz or 8000Hz, your CPU works significantly harder processing all those extra USB interrupts. If you’re on an older system, you might notice FPS drops in CPU-heavy games. That’s why 1000Hz remains the sweet spot—great responsiveness without overwhelming your processor.
Is 8000Hz polling rate worth it?
Only if your hardware can handle it. You’ll need a powerful CPU (Intel i7 9th Gen or AMD Ryzen 7 2nd Gen minimum) and a monitor capable of 240Hz+ to actually perceive the difference. For most casual and even serious gamers, the jump from 1000Hz to 8000Hz is barely noticeable. So unless you’re a professional esports player with top-tier gear, stick with 1000Hz and save your CPU resources.
Can high polling rate cause FPS drops?
Yes—this is one of the most common complaints. When your mouse reports its position 8000 times per second, your CPU gets flooded with data. In CPU-bound games like Counter-Strike or Valorant, this can cause frame rate stutter or inconsistent performance. If you experience this, simply reduce input lag by lowering your polling rate to 500Hz or 1000Hz for a smoother experience.
How do I change polling rate on a Mac?
MacOS doesn’t offer native polling rate adjustment. However, you can use third-party tools like Basilisk or MacRazer to tweak the setting. For Logitech mice, Logitech G HUB works on macOS too. If you’re using a generic mouse, you’re out of luck—MacOS limits USB polling to 125Hz by default. Your best bet is to use a Windows PC or Boot Camp for gaming.
Why does my 8K mouse only show 1K out of the box?
This is actually by design! Most manufacturers set the default to 1000Hz for maximum compatibility. Not every system can handle 8000Hz smoothly, so they ship it at a safer setting. To unlock the full speed, simply open your brand’s software (like Razer Synapse or Glorious CORE) and manually select 8000Hz polling rate from the dropdown menu.
Does polling rate affect wireless battery life?
Hugely. Running your wireless mouse at 1000Hz drains battery faster than 125Hz. At 4000Hz or 8000Hz, you’ll notice a significant drop in battery longevity—sometimes cutting it in half. For everyday browsing or office work, consider lowering your polling rate to 125Hz or 250Hz. Then crank it back up when you’re ready to game. This simple habit keeps your mouse running longer between charges.
What’s the difference between polling rate and DPI?
This is a classic confusion. DPI (Dots Per Inch) determines how far your cursor moves per inch of physical mouse movement—it’s all about sensitivity and speed. Polling rate determines how often your mouse updates its position—it’s all about responsiveness and smoothness. You can have high DPI with low polling rate, or low DPI with high polling rate. They’re independent settings that work together for your overall feel.
Can I change polling rate on a cheap office mouse?
Often, no. Budget mice usually have a fixed mouse polling rate of 125Hz built into the hardware. However, you can try third-party tools like HIDUSBF to override the USB settings on Windows. Success varies, but it’s worth a shot! If the tool doesn’t detect your mouse, it’s likely locked by the manufacturer. In that case, consider upgrading to a gaming mouse for full control.
Will a higher polling rate improve my aim?
It can reduce input delay, which helps your aim feel more responsive and crisp. But here’s the honest truth—practice and skill matter way more than hardware. A pro player with a 125Hz mouse will still out-aim a casual player with an 8000Hz mouse. That said, if you’re already skilled, lowering your input lag by switching to 1000Hz can give you that tiny competitive edge in fast-paced shooters.
How do I check my current polling rate on Windows 11?
Windows doesn’t have a native tool for this. Your best bet is a free online mouse polling rate test like dpianalyzermouse.com or MouseTester. Just click “Start,” move your mouse in fast circles, and read the average Hz. It takes less than 30 seconds and gives you a clear baseline before you start tweaking settings.
Final Verdict: Which Polling Rate Should YOU Choose?
Let’s cut through the noise. Here’s your quick cheat sheet for the right polling rate:
- Office work, browsing → 125Hz – 250Hz
- Creative design → 250Hz – 500Hz
- Casual gaming on older PCs → 500Hz
- Competitive gaming on modern rigs → 1000Hz (gold standard!)
- Pro esports with 240Hz+ monitors → 4000Hz – 8000Hz
For 90% of users, 1000Hz is the best polling rate for FPS games. It gives 1ms latency without CPU strain, battery drain, or stutter. Pick what fits your gear and game on!